NIH challenges public to help bring discovery into the classroom
The NIH goal is to identify hands-on experiments that:
- are geared toward grades K-12
- use safe, easily available, inexpensive materials
- take 90 minutes or less of in-class time
- have at least one clear learning objective tied to science standards
- are related to health and life science, the NIH mission
Elementary School
- Is Posture Really Important?
-
Background
By: Ethan Evans, Austin Watters, Connor Hanson, and Adib Babaei | Coppell High School, Coppell | Grade Level: Elementary School | June 6 2012
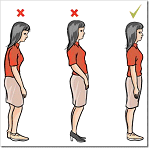
Posture can have a big impact on you. Good posture helps you to breath, prevents your back from hurting, makes you taller, and supports a strong body. Many people slouch or lean forward rather than standing up straight. But what happens when you have bad posture? This experiment will demonstrate what can happen when you don’t stand up straight.
Figure 1. Examples of bad and good postures.
Objective
This experiment will show what happens when a wooden ruler and a flimsy ruler are exposed to weight. It simulates what happens to a person with good posture vs. bad posture.
Hypothesis
The sturdy ruler (perfect posture) will be stronger and will not bend when weight is placed on it. The flimsy ruler (poor posture) will bend when weight is placed on it.
Duration
Total actual in-class time: 40 minutes
Set-up time: 5 minutes
Experiment’s run time: 30 minutes
Take-down time: 5 minutesMaterials
- 1 wooden ruler (good posture)
- 1 flexible/flimsy ruler (bad posture)
- 2 support blocks for the rulers
- 1 weight (preferably about 100 grams)
Safety Considerations
This experiment is not considered hazardous.
Procedure
- Place supporting blocks 6 inches away from each other.
- Place the wooden ruler across the 2 supporting blocks.
- Note whether the wooden ruler bends without any weight on it.
- Place the 100-gram weight on the wooden ruler.
- Examine what happens to the ruler.
- Remove the weight.
- Do not change the distance between the supporting blocks.
- Place the flexible ruler across the two supporting blocks.
- Note whether the flexible ruler bends without any weight on it.
- Place the 100-gram weight on the flexible ruler.
- Examine what happens to the ruler.
Data Analysis
- What happened to the wooden ruler when it did not have the weight placed on it?
- Did placing the weight on it cause any changes?
- What happened to the flexible ruler when it did not have the weight placed on it?
- Did placing the weight on it cause any changes?
- What does this tell you about posture?
- Why did you look at the rulers before placing the weights on them?
- Why is it important to use the same weight on both rulers?
Conclusion
The wooden ruler does not bend when weight is placed on it, whereas the flexible ruler does. This is similar to good posture vs. bad posture. Looking at the rulers before weights were placed on them allows you to know what “normal” (the control) is in an experiment. Once you know what “normal” is, you can conduct the experiment and compare the results with the “normal.”
Relevance to the NIH Mission
Students will have the opportunity to conduct an experiment, including controls. This will introduce them to the concept of an experiment and why a control is necessary.
- Stuffed Animal Science
-
Background
By: Ashley C. Grill and Katherine Koplik | New York University, New York City | Grade Level: Elementary School | June 11 2012
Scientists make predictions based on data they collect during their experiments. The data can come in various forms. The data must be accurate, and measurements can be taken more than once to ensure their accuracy.
Objective
Students will make predictions about how the weight and size of stuffed animals correlate by taking measurements of the length, weight, and circumference. This experiment is designed to introduce students to measuring techniques and making predictions.
Hypothesis
Students create their own hypotheses. For example: Stuffed animals with longer lengths and greater circumferences will weigh more.
Duration
Total actual in-class time: 30 minutes
Set-up time: 5 minutes
Experiment’s run time: 20 minutes
Take-down time: 5 minutesMaterials
- Stuffed animals
- Ruler
- Tape measure
- Kitchen scale
Procedure and Results
The following procedure should be carried out for each stuffed animal.
- Place the stuffed animal to be measured on a flat surface.
- Using a ruler or tape measure, measure the length of the stuffed animal (see Figure 1) and record the measurement on the data table (Table 1).
- Using a tape measure, measure the circumference of the stuffed animal (see Figure 2) and record on the data table.
- Using a kitchen scale, weigh the stuffed animal (see Figure 3) and record on the data table.
- Repeat Steps 1 through 4 for all stuffed animals.
Figure 1. Measuring the length.
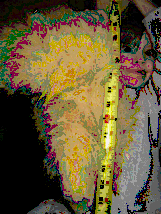
Figure 2. Measuring the circumference.
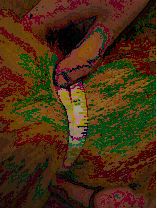
Figure 3. Weighing using a kitchen scale.
Sample Table 1. Results from an actual stuffed-animal experiment.
Stuffed-animal name Length Circumference Weight Ringo 21 inches 11 inches 11ounces Daddy Cat 10 inches 5 inches 4 ounces Ringey 18 inches long 12 inches 5 ounces Data Analysis
After recording the data, students should revisit their hypothesis to see if their prediction was correct. In this example, students should look over the measurements and see whether there is any correlation between the length and circumference and the weight of the stuffed animals.
Conclusions
Students will make their own conclusions on the basis of the data they collected. In this example, they could conclude that based on the data taken from this experiment, the stuffed animals with greater lengths and circumferences weigh more than those stuffed animals with shorter lengths and circumferences.
Note: Not every experiment done with stuffed animals of varying sizes will have the same results.Relevant OSE Supplement
Open Wide and Trek Inside
Student Handout: Stuffed-Animal Science
Name: ________________________
Date: ________________________
Table 1. Data from stuffed-animal measurements.
Stuffed-animal name Length Circumference Weight Download this Experiment (PDF, 176KB)
- Do Antimicrobial Agents Slow the Growth of Microbes on Potatoes?
-
Background
By: Carla Easter, Russell Winters, and Ryden Winters | National Human Genome Research Institute, NIH | Grade Level: Elementary School | June 6 2012
Potato slices can be used as a solid medium (that is, as food for bacteria) for isolating bacteria that can grow on them. We were interested in finding out whether antimicrobial agents would hinder the growth of bacteria on potato slices, just like they are supposed to hinder the growth of microbes on our hands. We have all been told that we need to wash our hands or use antimicrobial agents to keep our hands clean in order to stop the spread of various microbes like bacteria and viruses.
We can use a number of things to stop the growth of microbes on the skin, such as hand sanitizers, soap, and dishwashing liquid. In this experiment, we will explore the effectiveness of various materials in stopping the growth of microbes, mainly bacteria and mold, on potatoes.
Objective
To test the effectiveness of various antimicrobial agents and their ability to slow the growth of microorganisms on potato slices.
Hypothesis
Students may hypothesize that exposure to antimicrobial agents will slow the growth of microbes on the potato slices and that certain antimicrobial agents will be more effective than others.
Duration
Total actual in-class time: 90 minutes
Set-up time: 60 minutes
Experiment’s run time: 5 days
Take-down time: 10 minutesMaterials
- One large baking or sweet potato (depending on your region of the country; $1 per lb.)
- Paper towels ($1 per roll)
- Tap water
- Various antimicrobial agents (dishwashing detergent, hand sanitizers, alcohol wipes; varying prices ranging from $1 to $3 per container, which should be enough for the entire class)
- Clear, resealable plastic sandwich bags ($2 per box of 20)
Safety Considerations
This experiment is not considered hazardous.
Procedure
- Slice a potato in ¼-inch slices and place in a pot. Add enough tap water to cover the potato slices. Bring the water to a boil, and let the potatoes cook for 10 minutes in the boiling water. Be very careful not to burn yourself, and have an adult assist you.
- Let the potato slices cool for at least 30 minutes.
- Carefully check the potato slices to make sure they are cool enough to handle.
- Decide which antimicrobial agents you would like to test.
- Take one of the potato slices and place it in one of the plastic bags and seal. This will be our control. Using a permanent marker, mark the bag with a “C.”
- For our experiment, we decided to use hand sanitizer, dishwashing liquid, and an alcohol wipe, but any number of materials, including baby wipes and hand soap, can be chosen.
- Place half a teaspoon of hand sanitizer on one side of the potato slice, and use a paper towel to rub it into the potato. Repeat the process on the other side using another half a teaspoon of hand sanitizer. When done, place the potato slice in a clear plastic bag and seal. Make sure to label the bag. Write “HS” on the bag with a permanent marker.
- Place half a teaspoon of dishwashing liquid on one side of the potato slice, and use a paper towel to rub it into the potato. Repeat on the other side of the potato using half a teaspoon of dishwashing liquid. When done, place the potato slice in a bag and seal. Make sure to label the bag “DL” with the permanent marker.
- Rub one side of the potato slice with an alcohol wipe, and repeat on the other side of the potato. When done, place the potato in a bag and seal. Make sure to label the bag “AW” with the permanent marker.
- Let the potato slices in the bag sit in a warm space for five days. Avoid placing in an area where they will be exposed to direct sunlight.
- Check the potato slices each day and record what you see on the data table. Observe the slices through the plastic. Do not open the bag!
Results
Record the following for each sample in Table 1:
- Describe what the potato looks like (color, shape, size) on each side.
- Without opening the bag, can you detect a smell?
- Do you notice anything growing on the potato? If so, describe.
Data Analysis
Compare each of the potatoes treated with the various antimicrobial agents and describe what is the same or different about them.
Conclusions
Draw some conclusions about how well the antimicrobial agents worked for inhibiting the growth of microbes on the potatoes. Discuss the purpose of antimicrobial agents and whether we can infer anything from the growth of microbes on potatoes about their growth on human skin.
Relevant OSE Supplement
- Open Wide and Trek Inside
Relevance to NIH Mission
The experiment ties in directly with the mission because it explores a health-related issue (microbes on food or skin) and addresses one way participants can help prevent infection.
Table 1. Results of putting antimicrobial agents on potato slices
Day Control Dishwashing liquid Hand sanitizer Alcohol wipes
- Euglena: The Phototaxic Protozoa
-
Background
By: Michael Espey | National Institute of Diabetes and Digestive and Kidney Diseases, NIH | Grade Level: Elementary School | June 8 2012
The free living single cell protists Euglena are unique in their ability to obtain energy by mitochondrial respiration (food) or chloroplast photosynthesis (light). Euglena uses their eyespot to orient and direct themselves via flagellar motion toward light sources in a process termed phototaxis. Euglena are microscopic. To the human eye, Euglena swimming in water have the appearance of a greenish haze.
Objective
Students learn to appreciate the diversity of life and consider what constitutes a plant or animal. Students also learn about experimental design by using a control and test group.
Hypothesis
Euglena move in a directed manner toward a light source.
Duration
Total in-class time: about 15 minutes
Set-up time: 1 minute
Experiment’s run time: 8 to 10 minutes
Take-down time: 1 minuteMaterials
- Euglena gracilis
- A desk lamp with an incandescent light bulb
- Two glass jars with lids (for example, pickle jars)
- Two sheets of opaque paper (for example, black construction paper)
- Two pieces of tape
- A pair of scissors
Stock Euglena gracilis can be obtained from Carolina Biological Supply for $16.00; ATCC also sells the organism frozen at a higher price.
Procedure
- Divide Euglena equally into two separate jars containing normal tap water.
- Fasten the lid loosely on each jar.
- Wrap one jar completely in opaque paper (taped to fasten). This is the control jar.
- Wrap the other jar completely in opaque paper (taped to fasten) except that that you’ve cut a numeral corresponding to the students’ grade level (about 1 inch tall). For example, third graders would cut out the number 3.
- Position both jars side-by-side a few inches from the lamp bulb.
- Point the lamp at the cut-out portion of the test jar and corresponding covered portion of the control jar. Turn on the lamp.
- Wait for 8 to 10 minutes.
- Turn off the lamp.
- Remove the paper from the control jar.
- Remove the paper from the test jar.
Results
No changes are evident in the control jar. In the test jar, Euglena have gathered on the glass next to the cut-out portion of the jar in the shape of the numeral.
Conclusions
Euglena are phototaxic, which means they have directed motility toward a light source. The control jar shows that in the absence of a gradient of light, these organisms are randomly distributed in solution.
During the experiment, teachers can draw a picture of Euglena and review the anatomy of key organelles (mitochondrial, chloroplast, eyespot, flagellum) and discuss their function. You can also discuss experimental design (test versus control conditions) and classification of life: plant, animal, etc. If the classroom has a microscope, students can directly observe the Euglena.
This experiment is a classic. Cutting out the grade number is my variation, which always draws a big cheer when I have performed this experiment with grade school students!
Download this Experiment (PDF, 78KB)
- 'Egg'stra Healthy Teeth
-
Background
By: Anna Goldblatt, Sheridan Samberson, and Nicki Diamond | Coppell High School, Coppell | Grade Level: Elementary School | March 19 2013
In this experiment, students use eggs as a model to determine which liquids stain teeth the most. Even though eggs are not an exact representation of teeth, the similarities in coatings of an egg and a tooth make staining between them comparable.
Enamel is the visible tissue of the tooth where it covers the anatomical crowning and the nerve. Enamel consists of minerals that protect the tooth. The different amounts of minerals in enamel contribute to the strength as well as the brittleness of the tooth. Enamel is avascular, meaning it has no blood flow and it is not renewable, so keeping the teeth clean is vital. Drinking liquids with high acid and sugar contents, such as colas or fruit juices, should be done in moderation because staining and decay can occur. This makes the process for rejuvenating the tooth very hard. The usual color of enamel is a very light yellow to a grayish white.
Eggshells are similar to tooth enamel. They share the same coloring, ranging from a light yellow to white. In addition, the eggshell protects the egg from breaking, just as tooth enamel protects the tooth from decaying.
Objective
Using eggshells as a model for teeth, students examine the extent of staining caused by three different liquids.
Hypothesis
A dark-colored liquid will stain the enamel on an egg more than water will.
Duration
Total actual in-class time: 45 minutes
Set-up time: 10 minutes
Experiment’s run time: 30 minutes
Take-down time: 5 minutesMaterials (per group of students)
- Beakers (3)
- Light-colored drink (for example, apple juice) (150 mL; $1)
- Dark-colored drink (for example, a cola or coffee) (150 mL; $1)
- Water (150 mL)
- Timer
- Eggs (3; <$1)
- Labels for marking beakers
Procedure
- Label the three beakers: A. control (water), B. light-colored drink, C. dark-colored drink.
- Fill each beaker with 150 mL of the appropriate liquid.
- Gently place one egg into each of the beakers.
- Set the timer to 30 minutes and press start.
- After the 30 minutes are up, remove the eggs from the beakers.
- Observe the eggs, noting any changes in coloration.
- Record these observations in Table 1.
- Clean up the lab.
Data Analysis and Questions to Consider
- How do the colors of the eggs differ from one another after soaking in the different liquids?
- Over time, how do you think your teeth will hold up to the different liquids you drink? Which type of liquids do you think will be best for you?
- How could this apply to your dental hygiene, and what have you learned from it to help maintain a healthy mouth?
Conclusions
Describe what you concluded from your observations.
Teacher’s Notes
- To prevent the egg from breaking, you can prepare hard-boiled eggs for your students.
- To minimize cost, buy one carton of a dozen eggs and split the class into four groups.
- Make sure you and your students handle the eggs carefully!
- When choosing the liquids, make sure there is enough for your class and be aware of your budget.
- A way to introduce the lab is to talk about dental health and the importance of keeping teeth clean. The lab is a demonstration of why people should take care of their teeth.
Helpful Resources
- National Institute of Dental and Craniofacial Research (NIDCR), Oral Health, http://www.nidcr.nih.gov/oralhealth/
- Child Dental Health, MedlinePlus, https://medlineplus.gov/childdentalhealth.html
- Women in Dental Research (video), https://www.youtube.com/watch?v=qYQJvES_WBk
Relevant NIH Curriculum Supplements
Student Handout: “Eggs”stra Healthy Teeth Results
Name: _________________________
Table 1. Draw your results here: How did the eggs look after soaking in the liquids? (Draw an egg-shaped and egg-sized oval below each treatment and then draw in the results.)
Water Dark Liquid Light Liquid Download this Experiment (PDF, 135KB)
- Apple Tooth Decay: How do Cavities Hurt Your Teeth
-
Background:
In this experiment, students use an apple as a model to investigate tooth decay. Like most models, the apple is not a perfect model for investigating tooth decay; an apple is not a tooth. However, you can use the apple model despite its limitations to help students transfer ideas about the apples to ideas about tooth decay.
Tooth decay (dental caries) is often recognized as a hole in the tooth, or a cavity. A cavity is actually the late stage of a dental infection that causes the tooth enamel to lose minerals. The apple model’s “hole in the apple” analogy is not entirely accurate because tooth decay begins under the surface of the enamel and not as a break or hole in the enamel. If the decay process continues unchecked, a cavity, or hole, eventually appears in the enamel. This, however, is a fine distinction and one that students don’t need to make. It is sufficient for students to discuss tooth decay as “cavities” in teeth at this time.
The apple is a good model because it graphically illustrates decay spreading into the apple from a hole in its surface. From this observation, students make predictions about tooth decay that starts from actions on the surface of the teeth. Students don’t need to understand details about how the decay process happens yet.
In this experiment, students will ask questions, conduct an investigation, gather data, and communicate their results. Practice with scientific inquiry will help students understand the process of tooth decay and develop the skills needed to understand the world around them.
Objectives:
After completing this activity, students will
- be able to plan and conduct a simple investigation and to share results with others;
- recognize that simple tools, such as hand lenses, thermometers, and balances, provide more information than the students can acquire using only their senses;
- realize that the processes of scientific inquiry can help them ask and answer a question;
- explain that scientists use models when they cannot investigate real things; and
- describe that cavities are the result of a process that begins in the enamel of teeth.
Hypothesis:
An apple with a hole poked in it will rot more quickly than an apple without a hole. Other factors (temperature, number of holes, etc.) will influence the amount of rot seen in the apple.
Duration:
Set-up time: 30 minutes (one class period)
Experiment's run time/data collection: 45 minutes, two days after set-up, for observations, data collection, and discussion
Take-down time: 5 minutesMaterials:
For the class:
- 1 apple, preferably Red Delicious
- 2 or 3 thermometers
- sharp knife to cut apples (for teacher’s use only)
- assorted materials for student investigations, such as plastic containers with lids; plastic wrap or small plastic bags; aluminum foil
- sheets of flip chart paper
- markers
For each team of 2 or 3:
- 1 apple, same type as control apple
- 1 hand lens
- 1 sharpened pencil
For each student:
- 1 copy of the Apple Record Page (at the end of the file)
- 1 pencil
- crayons or markers
Procedure:
Experiment Set-Up
- Show students an apple. Ask them to compare the apple with a tooth. How is the apple like a tooth? How is it different from a tooth?
- Set the stage for investigating tooth decay by asking students what they think would happen inside the apple if someone used a pencil to poke a hole in its skin. Tell students they will conduct a scientific investigation about an apple with a hole in it.
- Students will plan and conduct their investigations in teams of two or three. Each team will choose a question they think they can answer by investigating. For example, What will happen to the apple if we poke five holes in it and put it in the closet?
*Other examples of questions to study include:
What would happen if- we poked more than one hole in an apple?
- we made some holes deep and some holes shallow?
- we made some holes larger than others?
- we poked one or more holes in the apple, then put it in a plastic bag and sealed it?
- we poked one or more holes in the apple, then put it in the refrigerator?
- we poked one or more holes in the apple, then put it in a sunny place?
- we poked one or more holes in the apple, then put it in a dark, warm place?
- The team will write its question or have an adult help them write the question.
- The team members will decide who will perform each task.
Experiment Execution
- After teams have confirmed their scientific question and decided who will perform the tasks, distribute one apple per team.
- As a class, determine where to place the control apple. Make sure students know that they should observe the control apple as well as their experimental apple each time they make observations.
- Have students prepare a records page (see Apple Record Page at the end of this example) that addresses the following questions:
- What will happen to our apple if... (start hypothesis)
- Draw a picture of and write what they did to the apple
- We think our apple will... (end of hypothesis)
- Allow students to poke, treat, and manipulate the apples according to their hypotheses.
- Over the next 5 to 7 days, allow students to briefly observe the experimental and control apples. Because the change is gradual, require students to record their observations only once at the beginning, once in the middle, and once at the end of the investigation. Encourage students to use hand lenses and thermometers to record data about their apple or the environment of the apple.
- After 5 to 7 days (whatever time you designate for the investigation), cut open each team’s apple and the control apple. Instruct teams to observe their own apple and to record the results on their record page. Note that the inside of the apples will turn brown quickly after you cut them open. (See Figure 1.)You might wait to cut open the control apple until students have recorded the results from their experimental apple.
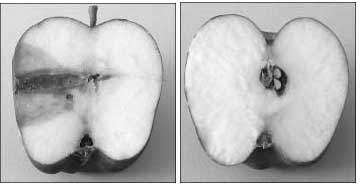 Figure 1. Halves of two apples cut open after 5 days of observation: left, 5 days after poked with a pencil; right, control apple (not poked).
 - Display all the team apples and the control apple. Label each apple according to its variables: number of holes, size of holes, in a plastic bag, in the refrigerator, in a closet, and so on. Invite students to observe the results from all the apples.
- Have students complete the sentence: "After __ days, our apple..."
Experiment Take-Down
- After the results have been documented, the apples can be discarded into the regular trash or compost.
Data Analysis and Questions to Consider:
- Review the teams’ responses to Question 3 above (We think our apple will...). Discuss whether their responses were accurate and why initial ideas are not always accurate.
- Discuss the results of their investigation
- What happened inside the apple? The inside of the apple turned brown; it began to decay.
- What made the apple begin to decay? We poked a hole in the skin or peel of the apple.
- What did the hole allow to happen inside the apple? The hole allowed something to get inside the apple and start the decay process.What is your evidence that something got inside the apples that had the holes? The inside of the apples that had holes turned brown. The inside of the control apple did not turn brown.
- Did all apples show the same amount of decay on the inside?
- Which apples showed more decay and why do you think that is?
- Since this apple is a model for our teeth, why is it important to protect your teeth so that they do not get holes in them?
If the bacteria in your mouth create a hole in the enamel of a tooth, then that tooth will decay, similar to what happened to the inside of the apple.
Remember that the apple is not a perfect model of a tooth. The decay process is not the same, although the appearance might be similar. The inside of the apple will turn brown upon exposure to the air. Tooth decay requires acids produced by oral bacteria. - Review the processes that students used to answer their initial question about the apple. Help students compare what they did to what scientists do when they conduct investigations or experiments. Help students realize that they can be scientists.
- Scientists ask a question. (What questions did students ask?)
- Scientists plan their investigation and use a control to try to answer their question. (How did the students plan and conduct their investigations? Did they use a control?)
- Scientists make predictions about what they think might happen. (What were students’ guesses?)
- Scientists use their senses to observe and gather evidence or data. (How did the students use their senses?)
- Scientists use tools to help them observe and gather data. (What tools did students use? How did using those tools help them?)
- Scientists record their observations and data. (Where did students record their observations?)
- Scientists share their evidence and data with others. (How did students share their evidence?)
- Scientists use their evidence and data from investigation results to answer their question or explain what happened. (How did students use their evidence to answer their question?)
- To end the activity, ask students what they would do differently if they repeated their investigation.
- Congratulate the students on their work as scientists.
Conclusion:
In our classroom experiment, we saw that poking a hole in an apple speeds up the rotting of the apple.
Apple Record Page
Scientist Names: ________________________ ______________________ ________________________
1. What will happen to our apple if ________________________________________ ____________________________________________________________________
2. This is what we did to our apple. Draw a picture here.
Write what you did to your apple here. ______________________________________________________________________ __________________________________3. We think our apple will ________________________________________________ ___________________________________________________________________
4. This is a record of what happened to our apple.
Date Our Experimental Apple The Control Apple
5. After _____ days, our apple __________________________________________ ____________________________________________________________________
Middle/High School
- Dental Hygiene Eggsperiment
-
Background
By: Jake Busboom, Jake Martinez, Nathan Friedman, and Irfan Riyaj | Coppell High School, Coppell | Grade Level: Middle School | June 6 2012
The goal of this experiment is to compare immediate and long-range effects of personal health choices on dental hygiene. Eggs share similar qualities with human teeth, which makes them a good model for this experiment. The textures of the tooth enamel and the egg shell are similar; both are calcium-rich and have a protective function. Coco Cola, Hi-C, and water are common drinks that have different effects on teeth. In this experiment, students analyze the different effects of these drinks on eggs.
Objective
This experiment will help students determine the effects of sugary drinks on teeth.
Hypothesis
The eggs that are submersed in Coca-Cola and Hi-C will show significant changes in color, wear, and weight compared with the ones submersed in water.
Duration
Total actual in-class time: 2 days
Set-up time: 20 minutes
Experiment’s run time: 1 hour 30 minutes
Take-down time: 20 minutesMaterials for each group (for a class of 30, working in groups of 5)
- 3 eggs
- 3 cups
- 1 can of Coca-Cola
- 1 can of Hi-C
- Water
- 3 beakers for measuring 200 mL of liquid and putting the eggs into
- Scale for weighing eggs
- Permanent marker
Procedure
- Using a permanent marker, mark three eggs as W, C, and H for water, Coco- Cola, and Hi-C.
- Label each of three cups with your group’s initials. Place each egg in a cup, and weigh each one. Record the weight and observations about the texture, color, and anything else you notice in Table 1.
- Pour 200 mL of each liquid (water, Coco-Cola, Hi-C) into three separate beakers.
- Check the label of each egg, and place it into the appropriate beaker of liquid so that it is fully submerged.
- Let the eggs sit in the beakers for 24 hours.
- Remove the eggs and record all observations, including the color and texture of the eggshell, and the color of the water, in the data table.
- Weigh the eggs again and record all observations (texture, color, color of water, etc.) in the data table (Table 1).
Data Analysis
- Why do you think the eggs changed color, texture, and weight, if they did?
- What can you do to prevent this effect?
- What do you think are some of the individual long-term effects of drinking each of these liquids?
Conclusions
What did you learn from this lab? List any sources of error. How can you apply what you learned to your daily life?
Teacher’s Notes
You can substitute other sugary drinks or sodas for the Coke or Hi-C.
You can extend the lab for higher-level students by adding a segment about toothbrush and toothpaste, which demonstrates the beneficial effects of brushing your teeth.
You can introduce the lab by talking about good diet habits and transition into the long- and short-term effects.Helpful Resources
- National Institute of Dental and Craniofacial Research (NIDCR), Oral Health, http://www.nidcr.nih.gov/oralhealth/
- Child Dental Health, MedlinePlus, https://medlineplus.gov/childdentalhealth.html
- Women in Dental Research (video), https://www.youtube.com/watch?v=qYQJvES_WBk
Relevant NIH Curriculum Supplements
Relevance to the NIH Mission
The experiment ties in directly with the mission because it explores a health-related issue and then highlights how the knowledge gained can enhance the health of participants.
Student Handout: Eggsperiment Results
Table 1. Results of Eggsperiment: before and after submersion of eggs
Treatment Texture before Texture after Color before Color after Weight before Weight after Other observations Coca-Cola Hi-C Water Download this Experiment (PDF, 86KB)
- Isolation of Strawberry DNA Using Household Products
-
Background
By: Carla Easter | National Human Genome Research Institute, NIH | Grade Level: Middle School, High School | June 8 2012
Deoxyribonucleic acid (DNA) is found in all living cells. One of its major roles is encoding all cellular proteins. The proteins expressed in a cell define the characteristics of the cell, and organisms are collections of many, many cells. Many of our physical characteristics are determined by the sequence of our DNA.
If you could separate and line up the amount of DNA contained in one human cell, it would be about 1 meter long. If all of the DNA found in a person were laid out, the DNA would stretch around the sun! A genome is the entire set of genetic instructions found in a cell.
This DNA-extraction activity results in a large quantity of DNA that can be seen with the naked eye. It is an easy activity, and, if you follow the instructions, there is almost no way to make a mistake that would affect the results. It is much more effective than extracting DNA from any other source because strawberries are soft and easy to smash. In addition, ripe strawberries produce enzymes (pectinases and cellulases) that help break down the cell walls.
Strawberries have enormous genomes. Humans have two copies of each chromosome (a diploid genome). A chromosome is an organized package of DNA found in the nucleus of the cell. Strawberries have up to eight copies of each chromosome (octoploid genome).
Objectives
- To learn an easy way to extract DNA from strawberries using household products.
- To see a large sample of DNA.
Hypotheses
Isolating DNA requires a few basic steps. DNA can be isolated from a strawberry using common household materials.
Duration
Total in-class time: about 30 minutes
Set-up time: 5 minutes
Experiment’s run time: 20 minutes
Take-down time: 5 minutesMaterials for each group of two people
- 1 resealable plastic bag (sandwich-size)
- 1 large or 2 small strawberries (fresh or frozen)
- 2 teaspoons of dish detergent
- 1 teaspoon of salt
- ½ cup of water
- 2 plastic cups
- 1 coffee filter
- Ice-cold 90-percent rubbing alcohol
- 1 wooden popsicle stick or plastic coffee stirrer
Procedure
- Get one large or two small strawberries. Pull off any green leaves that may remain on the fruit.
- Put the one large or two small strawberries into the plastic bag, remove excess air from the bag, and seal it. Gently smash the strawberries inside the bag for about two minutes. Completely crush the strawberries.
- In a plastic cup, make your DNA extraction liquid: mix together 2 teaspoons of detergent, 1 teaspoon of salt, and ½ cup of water.
- Add 2 teaspoons of the DNA extraction liquid into the bag with the crushed strawberries. This will break open the cells.
- Reseal the bag and gently smash for another minute. (Avoid making too many soap bubbles.) Place the mixture aside until ready to use again.
- Place the coffee filter inside the other plastic cup.
- Open the bag and pour the strawberry liquid into the filter. You can twist the filter just above the liquid and gently squeeze the remaining liquid into the cup.
- Next, pour an amount of cold rubbing alcohol equal to the amount of strawberry liquid down the side of the cup. Do not mix or stir. Just let the mixture sit for a few seconds.
- Within a few seconds, watch for the development of a white cloudy substance (DNA) in the top layer above the strawberry-extract layer.
- Tilt the cup and pick up the DNA using a plastic coffee stirrer or wooden stick. You have just isolated the DNA from the rest of the material contained in the cells of the strawberry.
Video of Experiment:Available at http://www.genome.gov/27541804 .
Data Analysis
- Describe what you see at each step of the activity.
- Were you able to isolate the DNA? If not, why do you think you were not able to?
- How would you describe the DNA and how much DNA did you see?
- How could you improve upon this experiment?
Conclusions
If the activity works, a clumpy whitish material resembling snot should be visible after the alcohol is added to the strawberry extract. This will be the DNA from the strawberries. The amount of DNA that is isolated may vary depending on a few factors such as the size of the strawberries used and how well the strawberry was crushed. This activity demonstrates that DNA from a strawberry can be isolated using household materials.
This activity was derived from the activities found at the National Human Genome Research Institutes website at http://www.genome.gov/27541804 and the University of Alabama Birmingham’s Center for Community Outreach Development. Minor changes were made to the background, materials, and procedures.
Download this Experiment (PDF, 78KB)
- Exploring Genetic Inheritance in Drosophila
-
Background
By: Franklin Carrero-Martinez and Adriana Méndez | University of Puerto Rico, Mayagüez Campus | Grade Level: High School | April 5 2013
Our module aligns with what students are learning in the science classroom from K–12 through undergraduate teaching laboratories. Adriana Méndez, an undergraduate research assistant, helped develop the procedure and collaborated with field testing in after-school programs at local schools. Our innovative, economical approach seeks to lower the financial barriers that prevent schools from accessing and using research-oriented activities at school.
Objectives
After completing this experiment, students will be familiar with
- Drosophila as a suitable genetic tool in biomedical research;
- the developmental stages, anatomical structures, and sex differences in Drosophila;
- basic Mendelian genetics, terms, and applications; and
- how to determine the genotypes of unknown parental strains by looking at the ratio of phenotypes in the resulting offspring.
By making genetic crosses between a wild-type and a mutant fly strain, students create offspring, known as the first filial generation. Students can then determine the genetic makeup of the parental flies.
Hypothesis
Students decide whether their hypothesis is that the mutation is on an autosomal or a sex chromosome.
Duration
Total actual in-class time (not to exceed 90 minutes): 30 minutes
Set-up time: 20 minutes
Experiment’s run time: 2 weeks
Take-down time: 10 minutesMaterials
If Purchasing Drosophila
- Vial of Drosophila wild type (1; $7) - http://www.carolina.com/life-science/genetics/drosophila-fruit-fly/10419.ct?intid=srchredir_drosophila&_requestid=187421
- Vial of Drosophila mutants (1 or 2; $7 each) - http://www.carolina.com/life-science/genetics/drosophila-fruit-fly/10419.ct?intid=srchredir_drosophila&_requestid=187421
- Sex-linked mutants
- Autosomal mutants
- 2 Alka-Seltzer tablets ($3)
- Beaker or plastic cups ($1)
- Cotton balls ($1)
- Tweezers ($1)
- Ziploc bags (sandwich size) ($3)
If Collecting Wild-Type Drosophila
- Vial of Drosophila mutants (1 or 2; $7 each)
- Sex-linked mutants
- Autosomal mutants
- 2 Alka-Seltzer tablets ($3)
- Mesh (mosquito net) (1 sq. ft.; $1)
- Handsaw blade ($2)
- Polypropylene tube ($10)
- Super glue ($2)
- Aluminum foil ($1)
- Small Petri dish ($1)
- Fruit ($1)
Procedure
Preparation
1. Acquire Drosophila. You may purchase mutant and wild-type flies online at a nearby laboratory, or you may purchase just the mutants and collect the wild-type ones yourself.
1a. To collect wild-type flies, start by building a collection chamber. See Figures 1–3. Next, select any available fruit (you can use mangoes, bananas, etc.). Cut a small piece of fruit and place in a 35-mm Petri dish and leave exposed for two to three days, or until fruit flies are attracted to the decaying fruit. When flies are on the fruit, close the chamber, as shown in Figure 3. Make sure it is not tightly sealed!
Wait a couple of days for flies to eclose (that is, for adults to emerge from larvae). Transfer to a “fly collection chamber.”
1b. To obtain flies from selected online sources or nearby Drosophila research laboratories, select from available, suitable wild-type and/or mutant fly lines.
2. Two weeks before the planned classroom activity, set up the genetic cross.
2a. Anesthetize wild-type flies and select 10 virgin adult female flies:
- Place a cup or beaker containing water inside a Ziploc bag.
- Leave a small opening, enough so a vial can be inserted and flies can be poured inside without falling into the cup with water.
- Rapidly insert an Alka-Seltzer tablet inside the cup of water, and seal the Ziploc bag. Leave until no movement is seen.
2b. Anesthetize mutant flies, and select five adult male flies following the procedure above.
2c. Sexing flies: Male and female fruit flies can be distinguished using the following criteria: (1) males have sex combs on the forelegs (Figure 4) and (2) the tip of the abdomen in females is slightly more elongated and “pointy” than in males (Figure 5).
2d. Add the wild-type female flies and the mutant male flies together into a vial. Add a cotton ball big enough to fit tightly. After a week, you will see larvae. Anesthetize the flies, discard them, and allow larvae to grow for one more week. Repeat the above procedure for every mutant line you have.
Experiment
3. Your teacher will give you two Drosophila fly vials. Both vials contain the F1 (first filial) generation of a cross set up two weeks ago.
3a. Using a magnifying glass or a microscope, observe the different stages of flies in your vial. Draw your observations in Table 1 (on the Student Worksheet), paying particular attention to eyes, wing shape, and body pigmentation. Use Figure 6 to help you identify the different stages.
3b. Anesthetize flies. Place the cup containing water, inside the Ziploc bag. Leave a small opening, enough so a vial can be inserted and flies can be poured inside without falling into the cup with water. Rapidly, insert an Alka-Seltzer inside the cup of water and seal the Ziploc bag. Leave until no movement is seen. Observe under the microscope or magnifying glass. Classify flies according to sex and mutation. Write your observations in Table 2 (on the Student Worksheet).
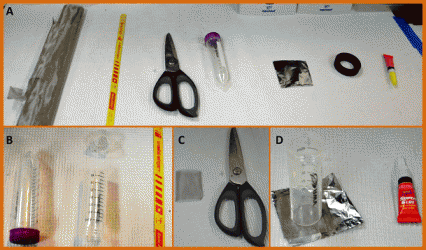 Figure 1. Constructing a fly-handling and -collection chamber. (A) Materials required for the construction of the chamber, from left to right: fine mesh, handsaw blade, scissors, 50-ml polypropylene tube, aluminum foil, custom-made plastic base, super glue. (B) Using the handsaw, cut the upper portion of the 50-ml polypropylene tube and clean the newly exposed edges. (C) Cut a 1-inch-by-1-inch fine mesh square. (D) Using super glue, attach the mesh and place it upside down in the aluminum foil. Aluminum foil is used to prevent damage to bench-top surfaces.
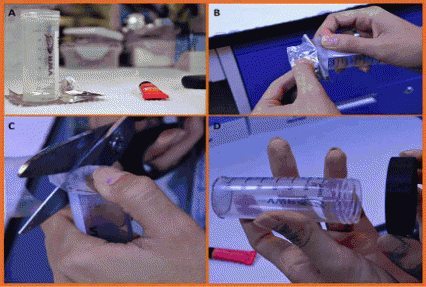 Figure 2. Finalizing the fly-handling and -collection chamber. (A) Once the glue is dried and the fine mesh firmly attached, (B) carefully remove the aluminum foil and (C) cut any excess mesh to conform the shape of the tube. (D) Here we used a custom-made plastic base on the tube, but you can use a small Petri dish bottom. Make sure the upper mesh is secure and that no holes are left where flies could escape.
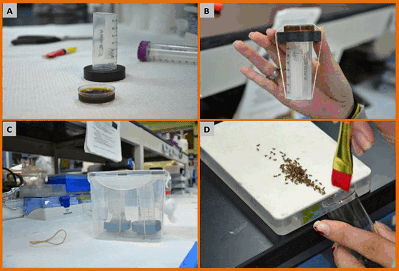 Figure 3. Preparing the fly-handling and -collection chamber for collecting wild-type flies. (A) Use 35-mm Petri dishes to hold the piece of fruit used to attract wild-type flies. Leave exposed for a couple of days and (B) secure to the custom-made plastic base with a rubber band. (C) Store the collection chamber in a plastic container for safe handling and storage. Make a circular hole in the plastic container and place a cotton ball in it. This allows oxygen into the container for the survival of the flies. Also, make sure a wet napkin is placed at the bottom to keep a humid environment appropriate for survival of the flies (D).
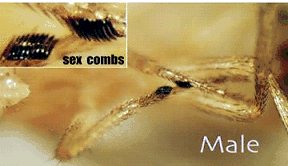 Figure 4: Sex determination by sex combs
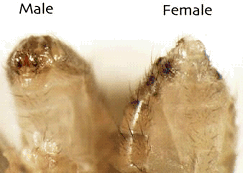 Figure 5. Sex determination using the abdomen as the criterion © Illinois State University
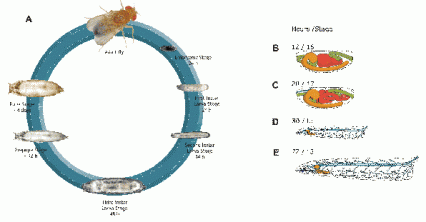 Figure 6: Drosophila life cycle. After egg-laying (AEL), it takes about 12 hours for embryos to reach stage 15, which we use throughout the present study. Shortly thereafter, all motor neurons find their correct postsynaptic partner muscle cells and establish a functional synapse. Once synaptogenesis is completed, muscle contractions begin and embryos hatch into a first-instar larva (L1). After about a day, it molts into a second instar (L2), and two days after hatching, the L2 larva molts again to become a third-instar (L3) larva. During these wandering stages, the larva feeds and eventually crawls out of the food and becomes encapsulated in the pupal case and undergoes metamorphosis. The Drosophila life cycle is completed in about eight days under ideal temperature (25°C) conditions (A). Diagram modified from Fly Move [http://flymove.uni-muenster.de]. (B-C) Embryonic developmental stages highlighting central nervous system and gut development events shown. (C) Stage 15 embryos are selected for the present study with corresponding light-micrograph stage 15 embryos. Once the embryo hatches at about 30 hours AEL, the first-instar larva (L1) develops mouth hooks and a tracheal system, is able to freely wander in search of food (D), and triples its size (E) in the next 32 to 48 hours after hatching to become a third-instar larva (L3). Figure: Vega and Carrero-Martinez, 2011.
Experiment Take Down
Discard flies outdoors or down a drain. If a drain is used, drown flies with water, pour down the drain, and let the water run for a few seconds afterwards.
Data Analysis
The idea is to work back to determine the parental genotypes from the ratio of F1. Using your observations from Table 1 (on the Student Worksheet), identify the sex and type of fly (wild type or mutant) in your cross in Table 2. In genetics, normal flies are called “wild type,” and any fly with a mutation is called a “mutant.” Mutant flies receive their names from the type of mutation. Each mutation is given a letter code. There are two types of mutations we could consider today: (1) autosomal mutations describe defects on a gene located in a non-sex-determining chromosome and (2) sex-linked mutations, which describe sex-linked genes, located on one of the sex chromosomes.
- Can you establish a relationship between the proportions of progeny with certain characteristics?
- With the proportions established, can you predict the genetic makeup of the parental flies?
- Is the mutation on an autosomal or sex chromosome? Explain how you reached that conclusion.
Conclusion
Through our experiment in the lab and in-the-field trials with local public high schools, we were able to establish the feasibility of our proposed implementation. The Drosophila genetic crosses laboratory is a well-established laboratory that has remained accessible mostly at the undergraduate college levels.
Relevance to NIH Mission
This activity is aligned with NIH’s mission in that it seeks “fundamental knowledge about the nature and behavior of living systems [in this case, Drosophila and genetics] and the application of that knowledge to enhance health and reduce the burdens of diseases.”
Supplementary Information
The study of inheritance began with Gregor Johann Mendel, who published his work in 1865. Then, during the early 1900s, Thomas Hunt Morgan started studying mutations in Drosophila flies. Based on research by Morgan and his students, the chromosome theory of inheritance was proposed. This theory simply states that chromosomes are the basis for all genetic inheritance. It also states that chromosomes are linear structures composed of genes. In 1915, Morgan and his colleagues wrote the book The Mechanism of Mendelian Heredity, which became the fundamental textbook for students of this new field. In 1933, Morgan was awarded the Nobel Prize in Physiology or Medicine for his work in genetics. To learn more about Morgan’s story, please visit: http://www.nobelprize.org/nobel_prizes/medicine/laureates/1933/morgan-bio.html
Drosophila are used extensively as a model organism in genetics, cell biology, biochemistry, developmental biology, and many other fields. In 1995, the Nobel Prize in Physiology or Medicine recognized Drosophila’s importance in human health. The recognition was awarded to Edward B. Lewis, Christiane Nüsslein-Volhard, and Eric F. Wieschaus "for their discoveries concerning the genetic control of early embryonic development." Learn more at: https://www.nobelprize.org/prizes/medicine/1995/summary/
The scientific classification of the fruit flies you will be using today is the following:
Domain: Eukarya
Kingdom: Animalia
Phylum: Arthropoda
Class: Insecta
Order: Diptera
Family: Drosophilidae
Genus: Drosophila (“dew lover”)
Species: melanogaster (“dark gut”)The Drosophila life cycle exhibits complete metamorphism (see Figure 1). This means that the life cycle includes egg, larva (worm-like), pupa, and finally emergence (eclosure) as an adult. The larval stage has three instars, or molts. Below is a rough developmental timeline.
Day 0: Female lays eggs.
Day 1: Eggs hatch.
Day 2: First instar (one day in length).
Day 3: Second instar (one day).
Day 5: Third and final instar (two days).
Day 7: Larvae begin roaming stage.
Pupariation (pupal formation) occurs 120 hours (about five days) after egg-laying.
Days 11, 12: Eclosion (adults emerge from the pupa case). Females become sexually mature 8 to 10 hours after eclosion.The time from egg to adult is temperature-dependent. The developmental timeline presented here occurs at 25°C. If the temperature is increased, the generation time becomes shorter. If temperature decreases, generation times become longer.
Organisms are composed of traits, which are determined by the genes individuals carry in their chromosomes. These traits that are expressed are called the phenotype (observable traits) and are determined by the genotype (genetic makeup) of an organism. In this experiment, we study how the expression of these genes affects traits using the fruit fly, Drosophila.
Genetic information is passed from parental figures to their offspring. Sexual reproduction starts by the formation of a zygote, which is a cell formed by gametes from the mother and father. Each gamete has genetic information from each of the individuals involved in the reproduction. In the zygote, the genetic information is stored in the chromosomes, which will be carrying the genes. Each gene expresses a certain characteristic due to the DNA it stores, but it can have two variants. It can express the characteristic passed down by the mother or the father. This is called an allele, an alternative form of a gene.
Genes inside chromosomes can be homozygous or heterozygous. The term homozygous refers to having two identical alleles for a certain trait, meaning the organism can have only one possible characteristic expressed because it inherited the same one from both parents. Unlike homozygous, heterozygous refers to having two different alleles for a particular trait. This means the organism will randomly express one of two possible characteristics passed down from each of the parents. In heterozygosis, one of these alleles will be determined as dominant, which will be the one who is being expressed phenotypically. A recessive allele will also be present but will not be expressing its genetic information.
In this experiment, we use Drosophila, a fruit fly that is a common model of study in science fields due to its size, quick reproducibility, simple maintenance, and short life cycle. This fruit fly is available in its natural form (wild type) or it can be genetically altered to express characteristics different to that of its normal state (mutant). These alternate characteristics are determined by the flies’ genotype. Usually, the wild-type flies’ genetic makeup cannot be determined by its phenotype because it comes from a natural habitat. Mutants are genetically altered and already predetermined with a certain genotypic inheritance pattern.
For scientist to determine the genotype of a wild-type fly, they must cross it with a fly that has the recessive phenotype of the trait that is being studied. Phenotypes of the progeny will explain the genotype of the wild-type parent. If traits remain the same in progeny, the wild-type fly also has a recessive genotype. If a difference is observable, the wild-type fly will probably have a heterozygous pattern of inheritance or a homozygous-dominant pattern of inheritance. Observe the following example crosses for recessive eyeless characteristics.
Here, we have two example crosses for the characteristic of eye appearance. The eyeless characteristic is recessive; therefore we can use this line to determine the genotype of the wild-type fly. If the wild-type fly is homozygous dominant, we will see that all the progeny will express the eye characteristic. If the wild-type fly is heterozygous, we will see that half the progeny will express the eye characteristic, and the other half will not.
Wild type: +/+ or +/–
Eyeless: ey/ey (homozygous recessive)ey ey + +/ey +/ey + +/ey +/ey ey ey + +/ey +/ey - -/ey -/ey
Student Worksheet: Exploring Genetic Inheritance in Drosophila
Name: _____________________________
Date: _____________________________Table 1. Using a magnifying glass or a microscope, observe the flies at different stages in your vial. Draw your observations in Table 1, paying particular attention to eyes, wing shape, and body pigmentation. Use Figure 6 to help you identify the different stages.
Eyes Wing Shape Body Notes
Table 2. The idea is to work back to determine the parental genotypes from the ratio of F1. Using your observations from Table 1, identify the sex and type of fly (wild type or mutant) in your cross in Table 2.
Fly Type Females Males Wild Type
Mutant
- Can you establish a relationship between the proportions of progeny with characteristics?
- With the proportions established, can you predict the genetic makeup of the parental flies?
- Is the mutation on an autosomal or sex chromosome? Explain how you were able to reach that conclusion.
Download this Experiment (PDF, 594KB)
